|
|
|
|
|||||||||||||||||||||||||||||||||||||||||||||||||||||||||||||||||||||||||||||||
|
New User Quick Start Guide REACH Delivery is a purpose built solution that provides an industry wide delivery and document control service for manufacturers, importers, distributors and downstream users. It supports the document delivery, receipt, control, update, audit and tracking requirements as set out as part of the REACH regulations. The system has at its core, a secure, internet-based communication gateway, which links directly between all companies subject to REACH regulations, and the company’s customers and suppliers. In addition, the service is able to demonstrate compliance and reduce the risk of enforcement and legal action. This New User Quick Start Guide provides you with some important information about the REACH Delivery system that you should now or may with to refer back to as you use the system. The document is split into several sections, to make it easy for you to go directly to the information you need. All new users to read to Initial set up configurations section of this guide.
Please click on the section in the list below for the section you require. Initial set up configurations (starting up as a Recipient) Additional things you need to know as an Administrator
What can you do at your user level
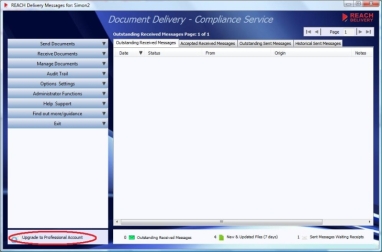
Initial set up configurations (starting up as a Recipient) What you should see when you have logged on:
Now that you have installed REACH Delivery the system will operate perfectly well from the default configuration, however, there are several configuration options which you should consider might be better changed to suit your company's requirements. These include: Change your password to something only you know (see password change in the help screens for further guidance) using the function in the “options” menu. Select which language to use for the REACH Delivery user interface (see set language in the help screens for further guidance) using the function in the “options” menu. Decide if you want your username to appear in a public directory that is available to other REACH Delivery users searching for you or if you wish to only have users that already know your email address or username to be able to contact you. Set your public address field accordingly (see set Public Address in the help screens for manage your public profile in the “options” menu). You are now set up as a REACH Delivery “Recipient” and can use the REACH Delivery system free of charge to receive messages, files and documents and “distribute”, which means to pass on, documents and files internally to your colleagues. Please see the following sections in this document for details of the other REACH Delivery roles such as Administrator and Sender. Once you have familiarised yourself with the REACH Delivery system you should return to the configuration options in the "manage" menu and consider changing the system's standard emails to match your language preference.
There is lots of helps available for your with REACH
Delivery
Each company using REACH Delivery has to have at least one user that also has the Administrator role. As a result, the first user in a company is assigned the administrator role by default. Users can stop being an administrator only if there is another administrator in their company. Companies can have multiple administrator roles if they wish. Each company using REACH Delivery has at least one user that also has the Administrator role. As a result, the first user in a company is assigned the administrator role by default. Users can stop being an administrator only if there is another administrator in their company. Companies can have multiple administrator roles if they wish. Being the administrator of REACH Delivery for a company is an important role; however, it does not need to be an onerous one. The administrator has access to additional system set up features in the "manage" menu (please refer to the main REACH Delivery help page for details of each of these). These features allow the administrator to perform tasks such as: change the standard emails that are sent out by REACH Delivery (maybe to another language), configure which types of files are saved locally on company computers, turn on context support for files, set up and manage company areas and alter the receipt options that a company requires from the standard REACH Delivery options. Approving other Users – provide usernames and passwords One of the most important tasks for an administrator is to manage the other REACH Delivery users within their company. When a new user is set up within their company (possibly by someone else trying to send them a message) the administrator is informed and has a number of tasks. The main task is to provide the new user with their username and password to access REACH Delivery. In many companies the administrator is also the IT department who will manage the installation of the small REACH Delivery client software onto a company computer, they will also decide if an employee is appropriate and authorised to use the REACH Delivery system. For users within your company set up by external REACH Delivery users in another company then you will have received an email with the new user’s username and password that you can provide to them. For new users within your company set up by yourself or someone else internally then select the “manage points of contact” option from the “Manage” menu, search for the user and set up their password by typing it in the appropriate boxes. You can now provide them their user id and password. Sending messages, files and documents through REACH Delivery The administrator can also setup themselves and also other users within their company to be "senders". To begin the process of becoming a sender an administrator must click on the:
Icon that appears at the bottom of the home screen for all Administrators. Please see below:
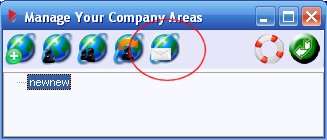
This will take the administrator into a secure payments area where they can choose to set up a payment plan and to either pay by credit card or invoice/bank transfer. Once payment is complete, the administrator is then able to set up the company area as approved for sending messages. Company areas are fundamental to setting up message senders. Administrators can set an area within their company to be an area that is enabled for sending and then any users that they move into that area will be able to send messages through REACH Delivery on that Administrator's account. When an administrator enables message sending, by signing up for a paying account within REACH Delivery, then they must set an area (possibly an area that only they are in) as a sender. Once the payment sign up is completed a new icon will appear at the top of this screen:
This new icon,
Finally, each user must me approved for sending and this is achieved by going into the “manage your public profile” option in the Options menu (for the administrator) or “manage points of contact” option from the “Manage” menu for other users, search for the user and check that the sender “user role” is selected.
Please click this link to review the current REACH Delivery pricing options REACH Delivery Pricing Options
What you
can do at your user level
Each user level within REACH Delivery
has the ability to perform different functions.
This summary will explain the main
functions now available to you at
your user level. The
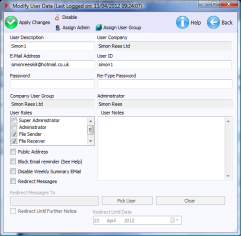
first thing you should do is check your user level, to
do this please access the "Manage
your public data" function from the options menu
which will bring up a screen similar to the one shown.
Your user roles are shown as those ticked.
Internal File Receiver
The internal file receiver role has limited
functionality. REACH Delivery is mainly used to
access files made available (through distribute files)
by other users and to onward
distribute files
only within
your own company. Use the familiarisation exercises
below to review the functionality available to an
internal file receiver.
File Receiver
The file receiver role is similar to the Internal
receiver role, however, a file receive can receive
messages and files from users outside of their company. Use the familiarisation exercises
below to review the functionality available to an
file receiver.
File Sender
The file sender is the most powerful role within REACH
Delivery. A file sender sends documents tor other
REACH Delivery users, as part of messages.
Fundamental to the REACH Delivery
system is the ability to send files (such as Safety Documents
documents) to others (Recipients, sometimes known as
points of contact or users) as part of a "message" and
then for these documents to be fully managed in a
disparate, wide network.
REACH Delivery supports the document delivery, control and
tracking requirements as set out as part of the REACH
regulations. Sending documents automates, guarantees
and controls the transfer and update of Safety Data
Sheets and all other associated REACH documents,
ensuring compliance by guaranteeing that only the very
latest documents are in use by an end user. The service
also provides for compliance support, alert mechanism,
full audit trail, reporting, customer response forms and
removal of outdated documents. For the end user
the service provides instant access to a local library
of the very latest REACH documents and allows them to
onward distribute these documents internally under the
same controlled environment. The service also supports
the linking and tracking of documents throughout.
Administrator (super administrator)
Being the administrator of REACH Delivery for a company
is an important role, however, it does not need to be an
onerous one. Every company using REACH Delivery
MUST have at least one administrator.
The administrator has access to the system set up
features in the "manage" menu (please refer to the
main REACH Delivery help page
for details of each of these). These features
allow the administrator to perform tasks such as;
change the standard emails that are sent out by REACH
Delivery (maybe to another language), configure
which types of files are saved locally on company
computers, turn on context support for files, set
up and manage company areas and alter the receipt
options that a company requires from the standard REACH
Delivery options.
However, one of the most important tasks for an administrator
is to manage the other REACH Delivery users within
their company. When a new user is set up within
their company (possibly by someone else trying to send
them a message) the administrator is informed and has a
number of tasks. The main task is to provide the
new user with their username and password to access
REACH Delivery. In many companies the
administrator is also the IT department who will manage
the installation of the small REACH Delivery client
software onto a company computer, they will also
decide if an employee is appropriate and authorised to
use the REACH Delivery system.
The administrator can also setup other users within their
company to be "senders".
There are also four main
user roles within the REACH Delivery system; An Administrator
function a file Sender, a Recipient and an Internal
Recipient function. In addition there is a
Super-administrator role that is the same as the
administrator with the exception that they can set up
further administrators. For details of these user types, how a
user will be designated an Administrator, a Sender or a
Recipient and some of the differences between the roles,
please click on this
link to descriptions of user types. The sender
role is the only role within REACH Delivery that is not
free to use and therefore administrator's need to be
aware of this before setting someone to be a sender.
Often the best way to understand a
new product is to use it. The following simple
exercises will help you to use some of the functions
within REACH Delivery.
Exercise
What to do
Expected result
The following
exercises are for all user levels
Login to
REACH Delivery
Obtain
your user id and password from the email or from
your administrator and follow the
instructions to Login
You will
be logged into REACH Delivery and will see the
main screen
Add two
files
Enter
File Management and add two of your own
files into REACH Delivery to become managed
files. Follow the instructions on the
add files help screen.
The
files added will appear on the file management
screen.
Associate files together
Associate the two files that you have added
together by following the instructions in the
file associations help screen.
The
files will appear on the file associations
screen as associated.
Distribute a file to a new internal user
In
File Management select one of the files you
have added (you may need to click the search
icon first) then click on the
Distribute File icon.
You will
reach the "select users for distribution" screen
Click on
the
Add User icon and add a colleague in the
company where you work. Follow the
instructions to
Distribute the File to this new user.
A screen
indicating that documents have been distributed
successfully should be displayed and your
colleague should receive and invitation to use
REACH Delivery.
Manage
your profile
On the
home screen click on the menu called Options
and then Click on
manage your public data and check the
"public address" box so that you can be found
through a search by other users.
If you
re-enter "manage your public profile" the
"public address" box will be checked.
The following Exercises are only for users that
are Administrators
Exercise
What to
do
Expected
result
Check
your role
On the
home screen click on the menu called Options
and then on
Manage Your Public Profile.
The
window entitled Modify User Data will
open showing in the top four boxes, your name,
your company, your e-mail address and your user
ID. Lower down on the left hand side of the
window is a box with a series of check boxes
which will list your various roles .
Set up a
new user
Set up a new user to receive files within
your company. It would be preferable to use a
real persons details for this exercise and be
someone who you have previously advised of your
intentions.
Your new
user will have been set up on your system and
will have received an e-mail advising them of
you having done so. They will be invited in the
e-mail to install REACH Ready on their desktop
and obtain their username and password from you
as you are their administrator (see next
exercise for how to find their username and
password).
Find
another user’s ID and Password
Go to
the
Manage Points of Contact menu
option in the “manage” menu, click find and then
select the user you have added. You will be
able to see all the information that the system
holds on that user. It should be noted that you
will see the password windows blank, however you
can reset the password here and then confirm it.
The
user's password will have been reset and the new
user will need to be informed of the new
password
Set up a
new email definition
The
REACH Delivery system holds a selection of
e-mails to send to user under certain automatic
circumstances.
Redefine an email by following the
instructions in the help sheet.
A
preset e-mail has now been redefined to reflect
company practices or protocols and will be sent
by the REACH Delivery system automatically hen
next called upon.
check
your company's areas
Company Areas can be use to help control and
define who can see which document and who can
communicate with what user. See which users are
appearing in which area.
You can
view your company areas or set up new ones and
move some of your users into these new areas to
assist your administration of the REACH Delivery
system.
View
messages received in the audit trail
The
Administrator is able to view the activity of
the users under his care when undertaking any
function on any files.
Using
the audit trail, try to
display e-mails received and sort them by
user or by company.
You will
be able to see who has received files or
messages and from which company and gain an
understanding of the other information that the
audit trail can give you.
The following Exercises are only for users that
are Senders
Send
Message to another User
Select
a user within your company or outside of your
company if you have privileges that will allow
it and
send them a message or document.
Your
selected recipient will receive the message and
file you sent to them, usually within a few
minutes.
Update a
file sent
If you
loaded the original document into REACH Delivery
and are therefore the document owner you may
chose to
edit the file.
Once
edited the file may be saved back onto the
server and other recipients of the document will
now see your edited document instead.
Forward
a Message
Forward
a message and any file attached to it to
other users within your company.
Your
selected recipient will receive the message and
file you forwarded to them, usually within a few
minutes.
Check
Message Audit Trail
Check
the
audit history of activity on any file or
message over which you have ownership. Send a
third party a document in a message and then
make an alteration
Any
activity on the file will show in the audit
trail.
Edit a
file
Go back
to the file management screen and follow the
instructions in the
edit a document help screen to edit one of
your documents.
Your
document will be updated and you will return to
the file management screen.
Add a
constraint to a file
Edit the document again and follow the
instructions for
restrictions to uncheck the "allow printed
copies" box
The
restrictions for your document will be updated
and you will return to the file management
screen.
Check
the update
Ask your
colleague to open the file in their version of
REACH Delivery and see that the change you made
is in the file that they open. Also ask them to
try to print the document.
You will
see that the change you made is in the file that
your colleague opens. Your colleague will not be
able to print the document.
|
|||||||||||||||||||||||||||||||||||||||||||||||||||||||||||||||||||||||||||||||
|
REACH Delivery Service Copyright © All rights reserved. |
Additional Support: Contact REACH Delivery Support Marketing and Sales: Contact REACH Delivery | ||||||||||||||||||||||||||||||||||||||||||||||||||||||||||||||||||||||||||||||